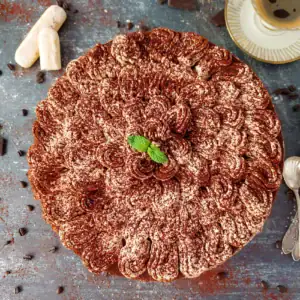
No Bake Tiramisu Cheesecake People Go Crazy For!
This No Bake Tiramisu Cheesecake tastes like classic tiramisu and rich New York cheesecake had a baby — and that baby is cooler than both of them! It’s a creamy, coffee-kissed dessert that blends the elegance of tiramisu with the richness of cheesecake, no oven required.
Ingredients
COOKIE CRUST
- 2.5 cups (250 g) digestive biscuits crackers (roughly 36 biscuits)
- 2 TBSP unsweetened cocoa powder
- ½ cup melted butter
- 1 TBSP brown sugar
MASCARPONE MIXTURE
- 28 oz (800 g) cream cheese
- 7 oz (200 g) mascarpone cheese
- 36 ladyfingers (Savoiardi)
- ½ cup sugar
- 2 TB brewed coffee (cold)
- 2 tsp vanilla
- 3 TBSP unsweetened cocoa powder
WHIPPING CREAM (for the filling)
- 1 cup (240 ml) heavy whipping cream
- ¼ cup sugar
- 1 tsp vanilla
COFFEE MIXTURE FOR LADYFINGERS
- 2 cups strong espresso or brewed coffee
- ¼ cup sugar
- 2 TBSP brandy (Kahlúa or Amaretto)
- 1 tsp vanilla
COFFEE WHIPPING CREAM (for decorating)
- 1 cup (240 ml) heavy whipping cream
- 2 TBSP brandy (Kahlúa or Amaretto)
- 2 TBSP coffee
- 3 TBSP powdered sugar
- 1 tsp vanilla
GARNISH
- cocoa powder for dusting
- coffee beans (optional)
- mint leaves (optional)
- chocolate shavings (optional)
Instructions
MAKE THE COFFEE
- Start by brewing a strong espresso or coffee. Pour it into a shallow bowl for dipping the ladyfingers, then stir in the sugar, brandy, and vanilla. Mix until the sugar fully disoves. Set aside and let it cool while you prepare the cheesecake filling.
MAKE THE CRUST
- Melt the butter in a small saucepan and set it aside. Blitz the biscuits in a food processor into fine crumbs, then mix in the melted butter until it looks like wet sand. Tip the mixture into a 9-inch springform pan and press it down evenly using the bottom of a glass. Pop it in the fridge while you prepare the cheesecake filling.
MAKE THE FILLING
- In a large mixing bowl, add the softened mascarpone and cream cheese. Using an electric mixer (with a paddle attachment if using a stand mixer), beat on medium speed for 2–3 minutes until completely smooth and lump-free. Be careful not to overmix, as the mixture can become too soft. Add the sugar and vanilla, then beat for another minute until fully incorporated. The mixture should be smooth, thick, and slightly glossy. (Taste the filling and see if you’d like it sweeter. I personally love the tang of the cream cheese, but if you prefer a sweeter filling, stir in an extra ¼–½ cup sugar at this point.)
- In a separate bowl, whip the cold heavy cream to soft peaks. Add the sugar and vanilla, then continue whipping until stiff peaks form. Be careful not to overwhip, or it may turn grainy.
- Add about one-third of the whipped cream to the mascarpone mixture and mix gently to loosen it. Then add the remaining whipped cream and fold it in with a spatula, keeping the mixture light and airy. Fold just until fully combined and no streaks remain. The finished filling should be thick, fluffy, and well aerated.
SOAK THE LADYFINGERS
- Quickly dip the ladyfingers, one at a time, into the coffee mixture for about 1–2 seconds. Do not soak them longer, or they will become too soft. Let any excess coffee drip off, then arrange them over the biscuit crust, gently pressing them together to form an even layer. Break a few ladyfingers as needed to fill in any gaps.
LAYER THE MASCARPONE MIXTURE
- Spread half of the mascarpone mixture over the coffee-soaked ladyfingers, smoothing it into an even layer with an offset spatula. Dust generously with cocoa powder. Add another layer of dipped ladyfingers, then top with the remaining mascarpone filling. Smooth the surface evenly.
CHILL OVERNIGHT
- Cover the pan tightly with plastic wrap and refrigerate for at least 6 hours, preferably overnight. This allows the cheesecake to fully set and the flavors to develop. Cutting into it too early may cause the layers to collapse and the texture to be too soft.Tip: Add a few toothpicks on top before wrapping so the plastic wrap doesn’t cling to the filling—you worked hard for that smooth, pretty layer.
DECORATE WITH WHIPPING CREAM
- When ready to serve, run a knife around the inside edge of the pan to release the cheesecake from the springform.Whip the cold heavy cream until soft peaks form, then add the sugar and vanilla and whip just until the sugar is incorporated. Gently fold in the coffee and brandy, and continue whipping until stiff peaks form — be careful not to overwhip, or the cream may become grainy. You can use a piping bag fitted with a star tip to decorate, or simply spread the coffee whipped cream on top and use the back of a spoon to create flowing, decorative patterns.
DUST WITH COCOA BEFORE SERVING
- Dust the top evenly with cocoa powder using a fine mesh sieve. For clean slices, wipe the knife between each cut. Enjoy!
Notes
Please note: this tiramisu cheesecake isn’t overly sweet. I love that cream cheese bite, but if you’re more of a sweet tooth, go ahead and stir in an extra ¼–½ cup sugar to the mascarpone mixture.